
1. 데이터 가져오기
- 43개의 교통 표지판 과 관련된 4만여 개의 이미지로 만들어진 데이터 셋
- https://sid.erda.dk/public/archives/daaeac0d7ce1152aea9b61d9f1e19370/published-archive.html
Public Archive: daaeac0d7ce1152aea9b61d9f1e19370
Support ERDA User Guide Questions about ERDA? Please contact us at support@erda.dk
sid.erda.dk
- https://drive.google.com/drive/folders/1AktNCWqVBv-4xxme4OUC82OLJTHzMFsq?usp=sharing
- 데이터 다운로드
   colab
	!wget https://sid.erda.dk/public/archives/daaeac0d7ce1152aea9b61d9f1e19370/GTSRB_Final_Training_Images.zip
!unzip -qq "GTSRB_Final_Training_Images.zip"- GTSRB\Final_Training\Images 디렉토리 안에 디렉토리 별로 이미지가 ppm 확장자로 분류되어 있다.
- ppm: 무손실 압축 이미지 파일 형식
- image 크기: 32 x 32
- 신경망 구조를 만들 때 선택 사항
- 2차원 컨볼루션에서 필터 개수 와 커널 크기
- Max Pool 에서의 커널 크기
- Fully Connected 계층(Dense)에서의 유닛 개수
- 계층 별 배치 크기, 최적화 알고리즘, 학습률, 할성화 함수, epoch 수 등
- 이미지 전처리
- 이미지 크기를 32*32로 수정
- 43개의 레이블을 생성: 디렉토리 이름이 레이블
- 표지판의 경우 구분해야 할 것은 색상이 아니라 모양: 이미지를 흑백으로 변경
- 데이터를 다룰 때 목적을 먼저 생각하고 작업을 시작해야 한다. (도메인)
- 필요한 패키지 와 상수 선언
- 클래스 개수와 이미지의 크기를 변수에 저장
- 이 두개의 절대로 변하지 않을 값
- 변하지 않는 값을 장할 변수의 이름은 모두 대문자로 작성하는 것이 좋다.
- SNAKE 표기법이라고 한다.
N_CLASSES = 43
RESIZED_IMAGE = (32, 32)
# 모듈
import matplotlib.pyplot as plt
#디렉토리를 핸들링 할 때 사용하는 모듈
import glob

from skimage.color import rgb2lab
from skimage.transform import resize
import numpy as np

from collections import namedtuple

from sklearn.model_selection import train_test_split
- 이미지 전처리를 위한 함수
- 이름이 있는 튜플 생성 - 다른 언어에서는 튜플을 이런 형태로 만든다.
- 튜플의 원래 목적은 변경할 수 없는 하나의 행(record, row)을 표현하기 위한 것
- 인덱스가 아니라 이름으로 구별하는 것이 타당
Dataset = namedtuple('Dataset', ['X', 'y'])
# 포맷 변경해주는 함수
def to_tf_format(imgs):
    return np.stack([img[:, :, np.newaxis] for img in imgs], axis=0).astype(np.float32)
- 이미지 디렉토리에 있는 모든 이미지들에 라벨링을 하기 위한 작업
- 이미지의 크기 변경도 여기서 수행
def read_dataset_ppm(rootpath, n_labels, resize_to):
    #이미지 데이터 와 라벨을 저장할 list
    images = []
    labels = []

    for c in range(n_labels):
        #루트경로/00001/ 형태로 이미지 경로를 생성
        full_path = rootpath + "/" + format(c, '05d') + "/"
        #각 이미지 디렉토리를 순회하면서 확장자가 ppm 인 파일의 경로를 가지고
        for img_name in glob.glob(full_path + "*.ppm"):
            #이미지 읽어오기
            img = plt.imread(img_name).astype(np.float32)
            #이미지를 정규화
            img = rgb2lab(img / 255.0)[:, :,0]
            #이미지 크기를 조정
            if resize_to:
                img = resize(img, resize_to, mode='reflect')
            #라벨 생성
            #43개 짜리 배열을 만들어서 자신의 인덱스에 해당하는 값에만 1을 대입
            #원핫 인코딩 된 라벨
            label = np.zeros((n_labels, ), dtype=np.float32)
            label[c] = 1.0

            images.append(img.astype(np.float32))
            labels.append(label)

    return Dataset(X = to_tf_format(images).astype(np.float32), y = np.matrix(labels).astype(np.float32))
# 이미지 전처리를 수행해서 데이터 만들기
dataset = read_dataset_ppm('./data/GTSRB/Final_Training/Images',
                          N_CLASSES,
                          RESIZED_IMAGE)
print(dataset.X.shape)
print(dataset.y.shape)| (39209, 32, 32, 1) (39209, 43) |
# 이미지 확인
plt.imshow(dataset.X[0, :, :, :].reshape(RESIZED_IMAGE))
print(dataset.y[0, :])| [[1. 0. 0. 0. 0. 0. 0. 0. 0. 0. 0. 0. 0. 0. 0. 0. 0. 0. 0. 0. 0. 0. 0. 0. 0. 0. 0. 0. 0. 0. 0. 0. 0. 0. 0. 0. 0. 0. 0. 0. 0. 0. 0.]]  |
- 훈련 데이터와 테스트 데이터 분리
#훈련 데이터 와 테스트 데이터 분리
idx_train, idx_test = train_test_split(range(dataset.X.shape[0]), test_size=0.25,
                                      random_state=42)

X_train = dataset.X[idx_train, :, :, :]
X_test = dataset.X[idx_test, :, :, :]

y_train = dataset.y[idx_train, :]
y_test = dataset.y[idx_test, :]

print(X_train.shape)
print(X_test.shape)
print(y_train.shape)
print(y_test.shape)| (29406, 32, 32, 1) (9803, 32, 32, 1) (29406, 43) (9803, 43) |
- 모델 생성
model = keras.Sequential()

#입력층 - Convolution
model.add(keras.layers.Conv2D(32, kernel_size=3, activation='relu',
                             padding='same', input_shape=(32, 32, 1)))
model.add(keras.layers.MaxPooling2D(2))

model.add(keras.layers.Conv2D(64, kernel_size=3, activation='relu',
                             padding='same'))
model.add(keras.layers.MaxPooling2D(2))

model.add(keras.layers.Conv2D(128, kernel_size=3, activation='relu',
                             padding='same'))
model.add(keras.layers.MaxPooling2D(2))

model.add(keras.layers.Flatten())

model.add(keras.layers.Dense(100, activation='relu'))
model.add(keras.layers.Dropout(0.4))

model.add(keras.layers.Dense(100, activation='relu'))
model.add(keras.layers.Dropout(0.4))

model.add(keras.layers.Dense(100, activation='relu'))
model.add(keras.layers.Dropout(0.4))

model.add(keras.layers.Dense(43, activation='softmax'))

model.summary()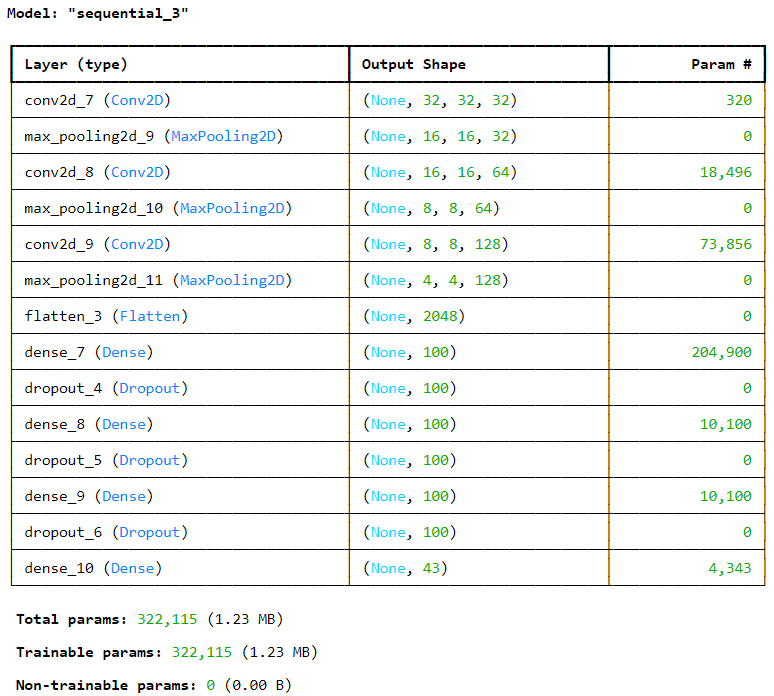 |
- 모델 컴파일
model.compile(optimizer='adam',
             loss='categorical_crossentropy',
             metrics=['accuracy'])
- 훈련
checkpoint_cb = keras.callbacks.ModelCheckpoint('best-cnn-models.keras')
early_stopping_cb = keras.callbacks.EarlyStopping(patience=2,
                                                 restore_best_weights=True)
history = model.fit(X_train, y_train, epochs=20,
                   callbacks = [checkpoint_cb, early_stopping_cb])
- 평가
print(model.evaluate(X_test, y_test))| 307/307 ━━━━━━━━━━━━━━━━━━━━ 3s 10ms/step - accuracy: 0.8567 - loss: 0.3981 [0.39652204513549805, 0.853820264339447] |
!git clone https://github.com/MachineLearning2020/Homework2-Caltech101.git
'Python > Python 실전편' 카테고리의 다른 글
| [딥러닝] CNN _ 패션 이미지 분류 (1) | 2024.03.22 |
|---|---|
| [전처리] 인구 소멸 지역 Cartogram (3) | 2024.03.20 |
| [전처리] 서울시 범죄 현황 시각화 (0) | 2024.03.20 |
| [전처리] 지도 출력 Choropleth (0) | 2024.03.20 |
| [전처리] 서울시 구별 CCTV와 인구 관계 분석 (0) | 2024.03.20 |